Thursday 1 March 2012

Troubleshooting Netgear ReadyNAS Duo Network Problems

A client's office experienced a power outage recently which adversely affected their Netgear ReadyNAS Duo device. Re-booting the device yielded a consistent flashing blue power LED with all the other LED's (disk 1, disk 2, act and the backup LED) not showing any activity. Also, at the rear of the device, the network LED's on the network interface connection were not flashing even though the device was connected to a live switch. Here are the steps I used to restore connectivity.

Symptoms: Flashing blue power LED, no other LED's flashing, holding the power button does not shut the device down, rear network connection LED not flashing, Netgear RAIDar software not identifying the NAS device.


1. Power down the device by unplugging the power connector at the back. There was no risk to the data here since no live activity was showing.

2. I performed what's called a firmware reset which re-loads the firmware on the device and does not affect the data within the internal disks. This differs to performing a factory reset which wipes everything including your data.

To do this, locate the Reset pin hole at the back of the device and use a pin to press and hold onto the soft button within the pin hole whilst the device is off.
While you have the reset button pressed, press the Power button at the front of the unit and hold the reset button until you see the disk 1 or disk 2 LED at the front of the unit flash. This usually takes about 5 seconds. Instantly stop pressing the reset button once the disk 1 or disk 2 LED flash. WARNING: Do not hold onto the reset button for longer than 5-10 seconds as the unit will do a factory reset (incl. data wipe) when the reset button has been pressed for about 30 seconds.

The unit will buzz and whir. Wait until you see the blue power LED light constantly on and not flashing.

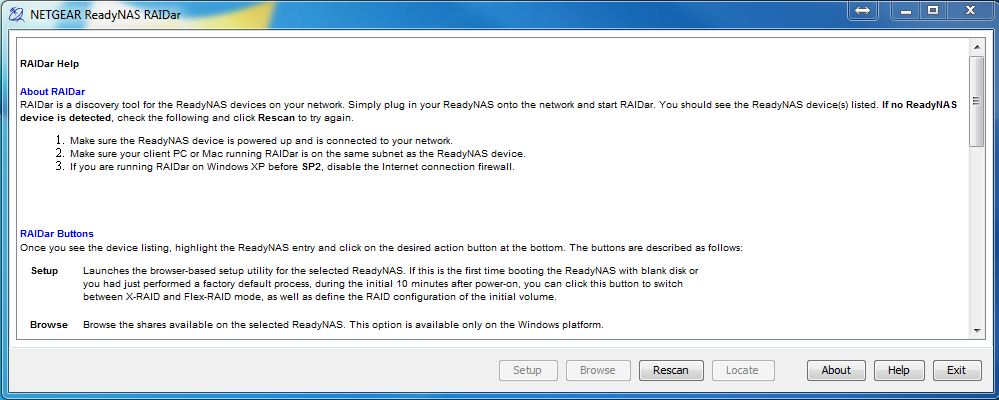
3. Ensure that you have a computer plugged onto the same network as the ReadyNAS unit and that you have the latest versions of Netgear RAIDar installed. Check if RAIDar can connect to the NAS.

4. If RAIDar still not finding the device, plug a network cable from a computer directly onto the ReadyNAS network port.

5. Go into your Computers network settings and change the IPv4 address to "static"
Windows 7: Start > Control Panel > Network and Sharing Center > Change Adapter Settings > Right-click on your Local Area Connection > Properties > Choose Internet Protocol Version 4 (TCP/IPv4) > Click Properties > Select Use The Following IP Address > Enter in IP: 192.168.168.160 > Subnet Mask: 255.255.255.0 > Press OK.


Take not of what the old settings were as you will need to change it back to normal after the repair has been made.

6. After a few seconds, check RAIDar again and it should show that the unit has been found with IP address 192.168.168.168. This is the default IP address of the unit when set for DHCP and when no DHCP server can be found.

7. Press setup on RAIDar. This opens up a web browser to show ReadyNAS Frontview to allow you to change the settings on the device. Enter username: admin and password: netgear1.

8. Click on Network. You should see a screen similar to below. Change IP assignment to Use Values Below and enter an IP address consistent with your normal network. For example, my normal PC receives IP 192.168.1.20 with netmask 255.255.255.0 therefore, I have set the ReadyNAS to 192.168.1.1 with netmask 255.255.255.0.


Tip: To find out your IP Address press Start > All Programs > Accessories > Command Prompt > type in "ipconfig" > Press Enter and note down the IP Address shown under your Local Area Connection or Wireless Connection (whichever you are using to connect to your network).

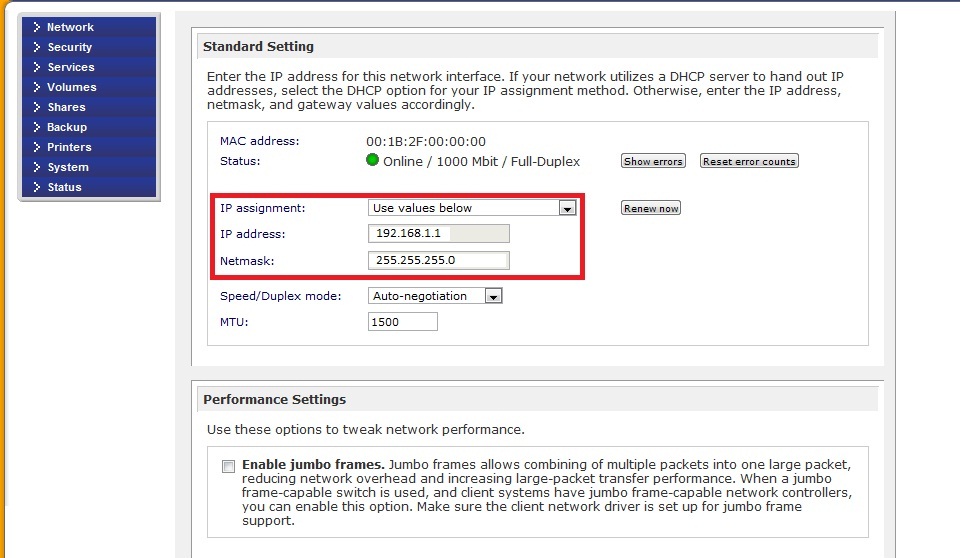
Once you hit Apply, you will lose connection to your NAS device. At this point, reconnect both your NAS and your PC to the network.

9. Rollback the change you made in Step 5 so that you have set Obtain an IP Address Automatically or whatever the previous setting was.

10. Check RAIDar and it should now show your NAS connected to the machine again with IP address set to what was entered in Step 8. Press Setup and you should be taken to ReadyNAS Frontview. You should now be able to access your files again.

Some other tips:
- Once reconnected, map a drive to your ReadyNAS to access your files
- If you would like to continue using DHCP, try changing the Speed/Duplex mode to see if this can resolve the issue

Thursday 5 January 2012

iPhone Spinning Wheel of Death Solution

When I woke up this morning, my iPhone 4 was showing a black screen with a round spinning wheel in the center.  Note that no apple symbol was showing, just a totally black screen behind the spinning wheel.


I let it be for about half an hour and then I figured, this can't be right.

I did a bit of research and tried different solutions including holding the home button and the sleep/wake button (top right hand corner) for 60 seconds - to no avail. Another solution included waiting for the battery to die out - with a fully charged unit I was not prepared to go down this path.

Here is the way I resolved the issue:
1. I plugged my iPhone into my computer
2. Opened up iTunes
3. Checked to ensure my iPhone was detected in the iTunes menu on the left


4. I noticed the Capacity indicator at the bottom of iTunes showing only a yellow Other indication.


5. I held down the home button and the sleep/wake button for about 15 seconds and the phone went blank.
6. Once it restarted, iTunes showed the correct Capacity again and the phone was back to normal.


Still no idea why the phone spontaneously crashed like that but I am glad that it is sorted.

Wednesday 28 December 2011

Restoring Data from Netgear ReadyNAS Duo Hard Drive

Recently, a new clients Netgear ReadyNAS Duo NAS device malfunctioned. Unfortunately, the hard drive that he had neglectfully placed in the NAS, WD 1.0 TB (WD10EALX), was not covered by the Netgear ReadyNAS Duo HCL list. I contacted Netgear Support anyway and as expected, they were unable to help.


Here are the steps I used to restore the data from the Linux based EXT3 file system that the ReadyNAS uses to store files internally. 


Note: This only works for non-RAIDed drives. i.e. Single drive only.


Pre-requisite: Installed version of VMware Player/Server running on a Windows machine.
Difficulty: Intermediate Linux, Beginner Windows, Beginner VMware.


1. Download acmtn Debian VMware Linux Image from here. (Size: 1.6GB - Kudos to Dekkit on the ReadyNAS forums) Tip: The VM requires at least 8GB of space.


2. Import the Debian5 VM onto your VMware platform. 
Tip: On your VMware platform, choose Virtual Machine > Add Virtual Machine to Inventory


3. Start the Debian5 VM and enter in vmuser as username and vmuser1 as the password


4. At this point, you will need a way to connect your HDD onto your machine. For my purposes, I ran this process from my laptop so I needed a SATA to USB adapter. 


Tip: If you are plugging your HDD via USB and  you are unable to detect it within your Debian5 VM, ensure you select it within VMware Server as shown below.


On your VMware platform, you should now be able to access the HDD. 


5. In the Debian5 VM, go to System > Administration > Partition Editor. On the right of the toolbar you should see a selection menu. Check  to ensure that you have a partition that is about the same as your HDD. e.g. /dev/sdb (931.51GB) for my 1TB WD HDD. Close the GParted window.


6. Now that your Debian5 VM can see the drive, we need to attempt to access the data. On the VM, click on Root Terminal on the Desktop and run the following commands, one after the other. Rmodprobe 


7. modprobe fuse This command is used to add modules to linux to be able to "talk" to the HDD


8. vgscan scans all SCSI, IDE and other disk devices on the system looking for LVM physical volumes


9. vgchange -ay c allows you to change the attribute of the HDD volume groups to "activate" and name the volume group as C


10. mkdir /mnt/lvm create a mount point for the volume group


11. ext2fuse /dev/c/c /mnt/lvm uses the installed ext2fuse utility to support the mounted EXT3 file system. You will notice a slight delay in output until this is displayed
"/dev/c/c is to be mounted at /mnt/lvm fuse-ext2 intiailized for device: /dev/c/c block size is 16384"
Once this is displayed, your HDD should be accesible.

12. Open another terminal window and enter cd /mnt/lvm. You should notice a few folders such as Media, Home, etc. If you enter in cd media then ls, this will list the files/folders in the Media folder.


13. Now you need to decide where you will be restoring your data to. The best is to copy to the VM Host machine so that you can access the data via your Windows machine. Remember that the Debian5 VM is only 8GB in total size. 


a. To mount a Windows network location, Open a Root Terminal again. 


b. Install smbfs by entering apt-get install smbfs and follow the prompts


c. modprobe smbfs allows the linux VM to talk to the Windows partitions


d. mkdir -p /mnt/restore creates a new mount point to later mount the access to the Windows share


e. On the host machine, create a new Windows share folder e.g. C:\Restored


f. Right click the folder and ensure Everyone has full share permissions and folder permissions

g. In the terminal, enter mount -t smbfs -o username=<PC name or domain>\<local user accountname> \\<host computer name>\c$\Restored /mnt/restore
e.g. my host computer is in a workgroup with name ERIKPC and account Erik. I entered in mount -t smbfs -o username=ERIKPC\Erik \\ERIKPC\c$\Restored /mnt/restore


h. you may need to enter in your local user password for the Host account (e.g. Erik account)


14. Now, you can simply copy files from the /mnt/lvm folder to the /mnt/restore folder. Enter cp -r /mnt/lvm/Media /mnt/restore will copy the files in the Media folder to the Windows share.


15. Install a new HDD into the ReadyNAS, re-configure it and copy the data back. 


More information:  Source: http://www.readynas.com/forum/viewtopic.php?f=11&t=35153